
How to diagnose Samsung Galaxy A40 Charging Problems

Video Overview

Learn how to repair your Samsung Galaxy A40 with this video overview.
  1. How to diagnose Samsung Galaxy A40 Charging Problems, +5V line: step 1, image 1 of 3 How to diagnose Samsung Galaxy A40 Charging Problems, +5V line: step 1, image 2 of 3 How to diagnose Samsung Galaxy A40 Charging Problems, +5V line: step 1, image 3 of 3
    • This is the +5V line from the Charging port to the Motherboard.

  2. How to diagnose Samsung Galaxy A40 Charging Problems, Back cover removal.: step 2, image 1 of 3 How to diagnose Samsung Galaxy A40 Charging Problems, Back cover removal.: step 2, image 2 of 3 How to diagnose Samsung Galaxy A40 Charging Problems, Back cover removal.: step 2, image 3 of 3
    • Warm the device to soften the adhesive.

    • Use Sanction cup, Plastic tools and isopropyl alcohol.

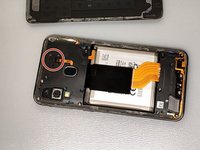
    • Remove the silver Phillips screws from the device's frame.

  3. How to diagnose Samsung Galaxy A40 Charging Problems, Fingerprint sensor: step 3, image 1 of 3 How to diagnose Samsung Galaxy A40 Charging Problems, Fingerprint sensor: step 3, image 2 of 3 How to diagnose Samsung Galaxy A40 Charging Problems, Fingerprint sensor: step 3, image 3 of 3
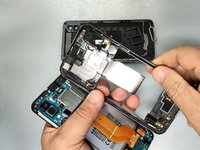
    • Remove the plastic cap from the Fingerprint flex cable connector and disconnect the cable.

    • Remove the SIM Tray.

  4. How to diagnose Samsung Galaxy A40 Charging Problems, Middle frame removal: step 4, image 1 of 3 How to diagnose Samsung Galaxy A40 Charging Problems, Middle frame removal: step 4, image 2 of 3 How to diagnose Samsung Galaxy A40 Charging Problems, Middle frame removal: step 4, image 3 of 3
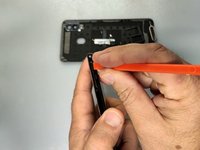
    • Use a plastic tool to separate the back cover from the frame. Start from the SIM tray hole.

    • Disconnect the battery.

  5. How to diagnose Samsung Galaxy A40 Charging Problems, Measurement: step 5, image 1 of 3 How to diagnose Samsung Galaxy A40 Charging Problems, Measurement: step 5, image 2 of 3 How to diagnose Samsung Galaxy A40 Charging Problems, Measurement: step 5, image 3 of 3
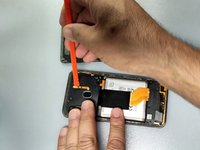
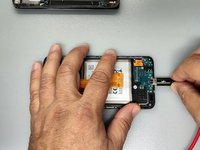
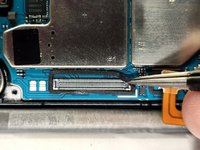
    • Disconnect the main flex cable and connect the charger.

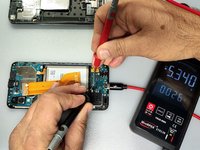
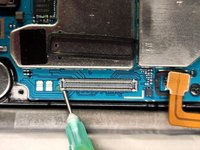
    • Use a multimeter to measure the voltages at the large end pins of the FPC connector of the charging board. (See the second image)

    • If the reading is okay (~5V) continue with the next step, if not - change the Charging board.

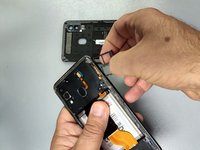
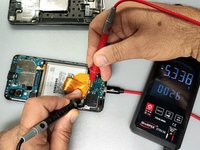
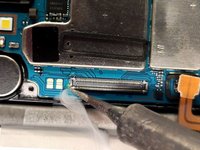
    • Attach the main flex cable and measure the large end pins of the Main flex FPC connector - pic.3.

    • If the reading is okay, continue with the next step, if not - change the Main flex cable.

  6. How to diagnose Samsung Galaxy A40 Charging Problems: step 6, image 1 of 3 How to diagnose Samsung Galaxy A40 Charging Problems: step 6, image 2 of 3 How to diagnose Samsung Galaxy A40 Charging Problems: step 6, image 3 of 3
    • Remove the adhesive rubber around the main flex connector on the logic board.

    • Use some flux and a soldering iron to re-solder the first pin of the motherboard FPC.

Conclusion

To reassemble your device, follow these instructions in reverse order.

6 other people completed this guide.

ZFix

Member since: 12/09/13

192,329 Reputation

330 Guides authored

Team

Master Techs Member of Master Techs

Community

321 Members

1,543 Guides authored

One Comment

How to fix samsung A50s with termometer logo on screen when charging

Den Bagoese - Reply

Add Comment

View Statistics:

Past 24 Hours: 10

Past 7 Days: 58

Past 30 Days: 237

All Time: 8,845