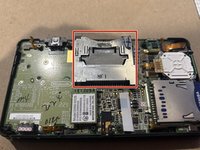
Nintendo 3DS Cartridge Reader Replacement

What you need

  1. Nintendo 3DS Cartridge Reader Replacement, Cartridge Reader: step 1, image 1 of 1
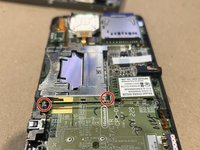
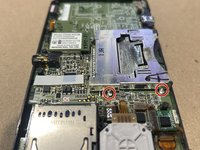
    • Use a JIS #00 screwdriver to loosen the four screws along the top of the back cover.

    • JIS (Japanese Industrial Standards) screws are not the same as Phillips. To avoid stripping these screws, make sure you are using a JIS #00 screwdriver and not a PHILLIPS #00 screwdriver. You can use a PHILLIPS #00 with a lot of downwards force but be warned this will deform the screw head and you risk stripping it.

    • IFixIt's Phillips head screwdriver is designed to reduce damage on JIS head screws so it should be fine to use, still apply more force. Make sure it's IFixIt's official Phillips screwdriver as we are unaware of any other manufacturer who does this.

  2. Nintendo 3DS Cartridge Reader Replacement: step 2, image 1 of 2 Nintendo 3DS Cartridge Reader Replacement: step 2, image 2 of 2
    • remove all 10 screws inorder to access the third layer and the motherboard of the 3DS ( don't forget the one near the game card slot !)

    • carefully open up the next layer of the 3ds as to not rip any of the ribbon wires

    • leave screws to the side for later reconstruction

  3. Nintendo 3DS Cartridge Reader Replacement: step 3, image 1 of 3 Nintendo 3DS Cartridge Reader Replacement: step 3, image 2 of 3 Nintendo 3DS Cartridge Reader Replacement: step 3, image 3 of 3
    • Now that all of the stuff is out of the way you will now solder the cartridge slot out

    • CAUTION: soldering iron can cause severe burns if not used properly, proceed with caution and have an adult in the room with you if underage

  4. Nintendo 3DS Cartridge Reader Replacement: step 4, image 1 of 1
    • now that the game cartridge reader is out of the way lets get the new one in and line it up with the previous one and re-solder it using a soldering wire

    • as mentioned previously soldering iron can cause severe burns if not used properly, proceed with caution

  5. Nintendo 3DS Cartridge Reader Replacement: step 5, image 1 of 1
    • Before closing off the device you will now use Isopropyl alcohol and a cue tip and clean the surrounding area so there is a good current and grip

    • If isopropyl alcohol is consumed it will cause irritation in the stomach and intestines

  6. Nintendo 3DS Cartridge Reader Replacement: step 6, image 1 of 1
    • remember to use the correct screws when closing the back plate of the device. if you use the wrong one then it can screw all the way into the motherboard

    • don't forget about the tiny silver screw near the game card slot.

    • you will be using the same screws from steps 1 and 2 for the current step and step 7

  7. Nintendo 3DS Cartridge Reader Replacement: step 7, image 1 of 1
    • make sure to close the back plate. if the back plate is not secures correctly and properly then it can cause any liquid or even dirt to enter and cause the battery to get ruined and the other inner components.

Conclusion

To reassemble your device, follow these instructions in reverse order.

Abraham Zapata

Member since: 03/05/24

145 Reputation

1 Guide authored

Team

One Comment

It might help to utilize a prerequisite guide up until the actual replacement of the cartridge slot. The IR board replacement is short and similar in step number in this regard.

Russ9876 - Reply

Add Comment

View Statistics:

Past 24 Hours: 9

Past 7 Days: 51

Past 30 Days: 217

All Time: 407